Procedure
Click "Add content" from the menu. The "Contents Management: New registration" screen opens.
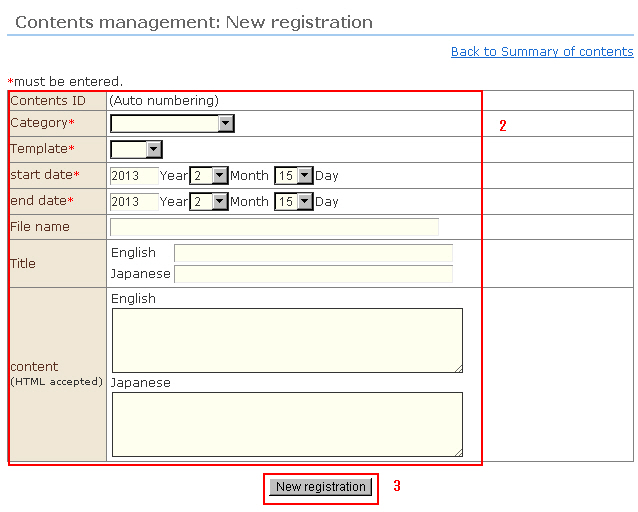
Enter the content details.
1) Category: The categories created at "Contents Categories Management" are displayed. Select the category to which this content belongs.
2) Template: The template whose type is assigned as "content details" at "Contents Templates Management" is displayed. Select the template to be used by this content.
3) Start date: The date that this content will be made public can be specified. When November 6, 2012 is specified, the content will automatically be made public from November 6, 12:00 a.m. (Japan Time).
To immediately make content public, enter a past date.
4) End date: The date that this content will no longer be made public can be specified. When November 7, 2012 is specified, the content will automatically be made public from November 6, 23:59 p.m. (Japan Time).
5) File name: The URL of the content can be edited as desired. When a file name is not entered, a different content ID will be issued each time that an article is created. So, even though the URL changes, by setting the file name the same URL will be carried over even if the article is rewritten.
■Content URL when a file name is not entered
http://domain/content_display languageID_currencyID_contentID.html
Example) http://testdomain.com/content_en_JPY_1.html
■Content URL when there is a file name “aboutus.html”
http://domain/contents/display languageID_currencyID/filename
Example) http://testdomain.com/contents/en_JPY/aboutus.html
* The display language ID and currency ID change according to the selections made by the customer.
6) Title: The title of this content
7) Content: The body of these contents.
※ Variables cannot be used in the contents function body. To acquire product information and assigned stock promptly, use the "Display function of goods using ajax" in the Basic Information Settings.
※ To customize screens using the display function of goods using ajax, knowledge of how to edit ajax is required.
2. Click the [New Registration] button.
3. After the confirmation message, the content will be created.